Sourdough

How-to-Create-a-Sourdough-Starter-Opening-Chatper-900x1024-2

I haven’t updated this site in a few years … I guess I got out of the habit. But we’re 8 weeks into the Coronavirus pandemic, and I seem to have some time my hands, so I thought I’d start in again.

A lot of people seem to be baking bread these days, which is great, especially if you can find the ingredients at the supermarket!  There seems to have been a run on flour here in Toronto.  Luckily, I’ve managed to scrounge up enough to get us through the next few weeks.  I’ve also heard that people are not able to find yeast in the stores.  Which, honestly, is not that much of a problem, if you’ve got a sourdough starter in your fridge. For most recipes, you can dispense with yeast completely when you bake with sourdough.  (I’m not sure I’d want to use sourdough for brioche, or for croissants … it might overwhelm the sweet, buttery flavour I’m looking for in these recipes.)

There are approximately 32 million web sites that talk about working with sourdough … I’m not going to try to compete with them by providing another set of complete, step-by-step instructions here.  All I want to point out here is that working with sourdough is not as fussy or labour intensive as some would have you believe.  For instance, I do not feed my starter several times a week, “just to keep it alive”; I don’t even feed my sourdough starter before baking with it.  To be clear, though, I use  (and replenish) my starter at least once a week, so it’s usually reasonably active at all times.

Here are some things I’ve come to learn about baking with sourdough:

  • Once you have a starter (here’s a good place to start), provided you use it regularly (e.g. once every 7 days or so), you don’t need adhere to a fixed schedule  for “feeding” it.
  • When using my starter, I usually just take a heaping tablespoon out of the starter jar, dissolve it in the water for my dough, and then add it to the flour, and mix the dough up. Generally, I don’t bother mixing starter with  a small quantity of flour and water, letting it sit for several hours to ferment and create a poolish, and then adding that mixture to the rest of the recipe ingredients. I find that adding the starter directly from the jar to the rest of the dough ingredients works just fine.  The caveat here is that you need lots of time for the yeasts in sourdough to become vigourous in your dough.  Like, 24 hours.  I usually mix my dough up in the morning, and let it sit in a covered bowl on the counter until bed time.  I give it a few stretch-and-folds in that time, then I mist it with spray oil, cover it, and put it in the fridge overnight. The next morning, after taking it out of the fridge, and letting it come to room temperature, it’s ready to be shaped into loaves.
  • When the level of starter in my jar starts to get low, I just mix in equal weights of flour and water to replenish it, and then let it sit out for a few hours to get bubbly. At that point, I cover it and put it back in the fridge.
  • It takes only the tiniest amount of starter to inoculate fresh flour and water with the necessary yeasts and bacteria to keep you starter going. Even if you scrape out nearly all of the starter in your starter jar for a recipe, there are enough microorganisms in the jar to get your starter going again, even if the jar looks pretty empty.


Candied peel

I don’t do a lot of baking for Christmas, but if I do, it’s likely I’m going to make plum puddings (which, technically speaking, are steamed, not baked), or maybe a fruit cake of some kind.  I haven’t decided yet.  But the time to make either of these has already passed: Stir-up Sunday, which falls on November 22nd this year, is the last Sunday before the beginning of Advent, and is traditionally the day when puddings are made.    A cake rich with fruit and nuts would ideally be made even earlier than this.  So I need to get going, since both cakes and puddings benefit from an aging or ripening period before they are eaten.  And both cakes and puddings have several ingredients in common, one of which is candied peel. […]

Practically perfect pork pie

Now that the Jewish high holidays are over, I feel it’s ok for me to reintroduce some trief into the house … so I thought I’d whip up some pork pies.

I don’t know what it is with me and English-style pork pies … I’ve always loved them. Not only are they tasty – for me, they’re downright addictive, dangerously so, given that they are hardly diet food – they’re just so, well, cute. […]

The perfect meatloaf

Very short post today.

Make this:  http://www.foodnetwork.com/recipes/mario-batali/lamb-and-veal-meatloaf-polpettone-recipe.html.

It’s insanely good.

It’s an peculiar cooking method: entirely on top of the stove.  But it works.  When browning it, it might be easier to do it in a shallow skillet … turning the loaf over in a dutch oven is a little tricky.  Once it’s browned, transfer all the oil and the loaf to a larger pot that you can cover.  And don’t plutz about the quantity of olive oil.  It helps to render the fat out of the lamb.

Seriously, once you’ve made this version, you’ll never go back to regular meatloaf again.

Kreplach

“I’m making the sequel to Emanuelle. I call it Temple Emanuelle. Actually it’s not dirty at all, it’s just a lot of kissing and mezzuzas. And er, one singular sub-plot, in which a woman who has an unnatural relationship with a Kreplach. I know there must be one or two of you out there, who haven’t got the vaguest idea what the hell is a Kreplach.  And to both of you I say … A Kreplach is a person from Kreplachia, which is a very small fishing nation wedged between Estonia and Latvia. You don’t hear from them too much since the iron curtain fell! But every now and again, one or two Kreplach’s manage to escape … but NEVER to Cleveland!”

Bette Midler, “Live at Last

I think that was the first time in my life that I ever heard word kreplach mentioned. This was back in the late 70s, in my friend Pierre’s living room. We were listening to The Divine Miss M’s latest album, which, in my opinion, was her finest. As far as I’m concerned, it was pretty much downhill for her once Beaches was released.

But I digress.  A kreplach (as I make them, anyway), is actually a dumpling stuffed with a mixture of ground beef, chicken, onions sautéed in schmaltz, and maybe some parsley. They look very much like the tortellini of Italian cuisine, though they are generally larger.  They are most often served in chicken soup, though they’re sometimes fried. Their deliciousness is proportionate to the trouble involved in making them, which is why I suppose they are considered the most elegant thing to serve in Jewish chicken soup.  You can buy them at some Jewish delis, fresh or frozen.  But if you’re like me, when you still have lots of chicken soup in the fridge, and the weather is crappy enough to prevent you from going out, and the only other thing you can think of doing to occupy your time is the ironing, you might consider making some.  If done entirely from scratch, it’s quite time consuming; but you can cheat, as I did, buy opting for store-bought dough for the kreplach.  All in, you’re looking at about an hour of time, perhaps less.

The recipe I use is adapted from Robert Sternberg’s Yiddish Cuisine, which, if can have only one book on Jewish food, should be the book you choose.

Here’s what you need:
  • 1 tablespoon schmaltz.  If you read my chicken soup post, you’ll know that schmaltz is worth it’s weight it gold.  If you don’t have any, use a neutral-tasting vegetable oil.  But the end result won’t be quite the same.
  • ½ cup finely minced onion
  • ¼ pound of lean ground beef
  • ½ cup of finely chopped (or ground) cooked chicken
  • 1 teaspoon finely minced parsley (I didn’t have any fresh parsley for some reason, so I used a large pinch of chervil, an herb I happened to have in my pantry that I use about once every two years.  It worked well.)
  • Round dumpling or wonton wrappers
  • A pastry brush
  • A glass of cold water
Here’s what you do:
  1. Put the schmaltz into a 10″ skillet, and place over a medium flame.
  2. When the fat has melted, add the onion, and give the pan a shake to coat the onion with the fat.  Sauté the onion for a few minutes, until it turns translucent.
  3. Add the beef, and break it up with a fork.  Cook the beef until it loses it’s raw colour.
  4. Remove from the heat, then add the chicken and parsley, and add salt and pepper to taste.  Give it a good stir and set it aside.
  5. Grab about 12-18 of the wonton wrappers, and re-wrap the rest and put them in the fridge.  (They will dry out and become useless if you don’t.)  Set up a space to assemble the kreplach, such as your kitchen table.

    IMG_2483

    Ready to start putting the kreplach together with my faithful assistant, Hudson.

  6. Now, the wrappers I had were fairly dry, and fairly heavily coated with flour or cornstarch.  I found they needed to be moistened so that they would behave properly (i.e. so that the dumplings could be sealed and shaped).  So, before filling each wrapper, a painted the perimeter of each wrapper with a pastry brush that had been dipped in water.  This moistened and softened the dough somewhat.
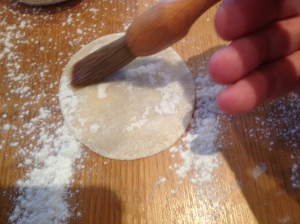
    Dampening the dough

    Dampening the dough

  7. Scoop up a teaspoonful of the meat mixture and transfer it neatly into the centre of the circle of dough: IMG_2488
    Make sure there is a half-inch border of dough all the way around without any filling touching it; if the filling spilled into this border, use your pastry brush to sweep it into the centre, otherwise, you will have a hard time sealing your kreplach.
  8. With the dough circle in front to you, pick up the edge of it at the 12 o’clock point on the circle, lift it up, and over until the 12 o’clock point meets the 6 o’clock point, and pinch 12 and 6 o’clock together: IMG_2489
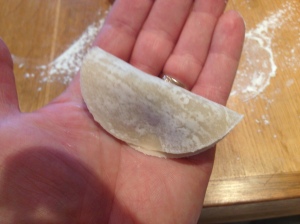
  9. Now, pinch the edges of the dough together firmly from 6 o’clock to 3 o’clock, and then from 6 o’clock to 9 o’clock.  It’s critical that the edges seal tightly; you might need to go over the seam two or three times to make sure it’s well sealed.
  10. If your dough is on the dry side, as mine was, dab the 9 o’clock position of the semicircle with your pastry brush to wet it. Then, gently twist the 3 o’clock corner past 2, 1, 12, 11 and 10 o’clock and press what was the 3 o’clock corner into the dampened 9 o’clock corner, and pinch it to make it stick together. You’ll get a shape that looks like this:
  11. IMG_2490
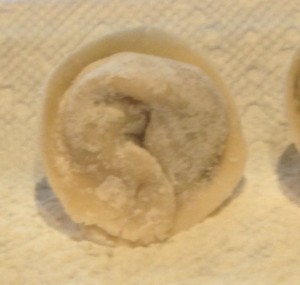
Place the kreplach on a floured towel.
  12. Repeat steps 6 – 11 until you’ve used up all your filling. It goes fairly quickly.

    This is all I got out of one recipe. There was one more kreplach, but I cooked it and ate it to make sure they were as good as I remembered.

    This is all I got out of one recipe. There was one more kreplach, but I cooked it and ate it to make sure they were as good as I remembered.

  13. Let the kreplach dry until the dough is no longer sticky to the touch.  If you are going to store them, dust them with flour, then put them into a plastic bag and refrigerate for up to 3 days.  If you want to store them longer than that, freeze them.  But when you defrost them, take them out of the bag first and place on a floured towel.  If they defrost in the bag, they will probably all stick together, creating an unholy mess.
  14. To cook the kreplach, I find it is best to use a skillet.  You don’t want the dumplings bouncing around in deep water in a saucepan, or else they might come open.  Fill a deep-ish skillet with about 1-½ inches of water, and add a scant teaspoon of salt to it.  Bring the water to the boil, and then slide in the kreplach.  They should be submerged or almost submerged in the water.  When the water returns to the boil, turn the heat to so that the water is just barely simmering. Again, violent boiling is likely to cause your kreplach to break up.   Kreplach should be cooked until the dough is quite soft; they are not eaten al dente.
  15. Put 2-3 kreplach into a bowl of very hot chicken soup, along with a tiny sprig of dill, and maybe a bit of cooked carrot (see my post on chicken soup for more details about garnishing) and serve at once.

Copyright © 2015, Allan Risk.  All Rights Reserved

Challah

Challah is the traditional braided bread of the Jewish Sabbath.  Unlike the heavy, somewhat sour everyday rye-based breads that were eaten by the poor of Eastern Europe, challah is made from white wheat flour, which has a lighter texture and flavour. In addition, it contains eggs, which create an even lighter, fluffier crumb, sugar to sweeten it, and oil to tenderize and enrich the loaf.  On the shtetl, where luxuries were few, challah was a once-a-week treat to remind families of the sweetness of life, and the goodness of God. […]

Gefilte fish

Depending on your experience with it, the words “gefilte fish” will have one of three effects on you:

  • You might say “What’s a gefilte fish?  Is it like a salmon?”
  • You might involuntarily gag a little bit
  • You might start salivating, and say to your self “Get the chrain!”

You’re most likely to have the first response if you’re not Jewish (or if your not an Ashkenazi Jew). The second response  most often comes from those who’ve only ever eaten the supermarket version of this delicacy, which I think is abominable.  The third is what the children of Jewish mothers who were good balabustas are likely to say.  Because homemade gefilte fish is amazing. […]

My chinois

Several years ago, I was at a friend’s house for dinner, and I saw this amazing utensil hanging from a pot rack in her kitchen.  It was a large, stainless steel cone, with a long handle.  The cone part was made with the finest stainless steel mesh you can imagine.  I asked her about it, and she explained that it was a chinois, and she used it when she needed a very fine strainer for soups or sauces.  She’d purchased in Paris, at the famous kitchenware store,  E. Dehillerin.  Well, I knew at once, that I needed one. […]

Jewish chicken soup

Jewish chicken soup is the ne plus ultra of chicken soups.  Unlike other soups made with chicken broth, Jewish chicken soup – REAL Jewish chicken soup – is simply chicken broth, taken to it’s logical, delicious extreme.  Forget the pictures you see of bowls of soup chock full of chunks of juicy white chicken meat, and glistening vegetables: no balabusta would be caught dead serving that for the soup course of an elegant dinner.  Jewish chicken soup is really more of a chicken consommé: sparkling and clear, with an intense chicken flavour that is rounded out by the essence of aromatic vegetables and an herb or two.  The broth is the main attraction, though simple garnishes are acceptable: some thinly-sliced carrots (or better yet, a brunoise of carrots), and maybe some knaidlachkreplach, or a small mound of fine egg noodles. […]